Почему выравнивать колено в соответствии с направлением второго пальца стопы во время тренировок и реабилитации неправильно?
Большинство из нас, тренеров, специалистов по работе с человеческим телом, в курсе популярного мнения о том, что во время выполнения упражнений следует выравнивать колено в соответствии с направлением второго пальца стопы (срединной линией стопы).
Многие из нас искренне верят в эту рекомендацию и интегрировали её в тренировочный процесс при выполнении приседаний, выпадов, прыжков и даже бега.
И мы убежденно продолжаем делать это, несмотря на существующие научные исследования и на то, что мы собственными глазами видим: фиксация колена в подобном положении не является естественным человеческим движением!
Так почему же мы покупаемся на эту сказку о необходимой соосности, если очевидно, что зафиксированное в сагиттальной плоскости колено – это неестественно?
Мы все знаем такие проблемы как пателлофеморальный болевой синдром, разрывы передней крестообразной связки и медиальной связки, знаем и о том, какое колоссальное влияние эти травмы оказывают на жизни пострадавших людей.
Также мы понимаем, что травмирование чаще всего происходит, когда колено слишком сильно заваливается внутрь во фронтальной плоскости, уходя в вальгусное положение в сочетании с ротацией в горизонтальной плоскости.
Раз вальгус колена с ротацией приводит к травмам, вполне логичным кажется исключение самой возможности совершения подобных движений с помощью намеренного удерживания направления коленного сустава в соответствии с вектором срединной линии стопы.
Уважаемые хирурги и исследователи создают «нам в помощь» программы и способы исключения данных движений. Доктор Гари Грей считает, что это очень серьезная, но непреднамеренная ошибка людей с большим добрым сердцем, к сожалению не понимающих суть функциональной биомеханики движения в трех плоскостях.
Слишком мало движения – также плохо, как и слишком много!
Почему же соосность колена и стопы — плохая идея?
Очевидных аргументов несколько:
Это неестественное движение. Люди так не двигаются в жизни.
В процессе тренировок требуется сознательный контроль, который невозможен в экстремальных условиях спортивных нагрузок.
Когда искусственное движение фиксации колена в сагиттальной плоскости все же достигнуто, блокируются движения во фронтальной и горизонтальной плоскостях, столь необходимые проприорецептивно для включения мощных мышц задней поверхности бедра, как раз помогающих обеспечивать безопасность коленного сустава.
Чтобы удерживать колено над срединной линией стопы также должна быть ограничена или полностью исключена подвижность в подтаранном суставе, что противоречит естественной биомеханике движения.
Нет никаких сомнений в том, что функциональные тренировки могут снизить риски травмирования колена, и никто не утверждает, что уменьшение травмоопасной амплитуды до «нормального» уровня – плохо. Однако «нормальность» амплитуды движения колена во фронтальной и горизонтальной плоскостях напрямую зависит от того, что именно человек делает.
Простые истины человеческого движения
Специалисты Прикладной Функциональной Науки (Applied Functional Science®) разрабатывают тренировочные стратегии, проводя своих подопечных по всем стадиям логической прогрессии. Важнейшей задачей является включение потенциально опасных, травмирующих движений в процесс тренировок, реабилитации или программ по предотвращению травм.
Для этого необходимо:
Исследовать подвижность колена и то, как оно управляется от бедра, стопы, как на него влияют движения рук и корпуса.
Провести оценку подвижности, которая определит успешные и неуспешные движения в трех плоскостях с использованием рук, ног и таза в качестве драйверов.
Определить наличие дисфункции, ограничивающей подвижность в одних участках и вызывающих чрезмерную мобильность в других участках тела.
Начать тренировочный процесс в зоне комфорта, успешного и контролируемого движения.
Выработать стратегии, позволяющие использовать преимущества Биомеханики Цепной Реакции в теле.
Модифицировать задания, чтобы отработать новые амплитуды и успешные зоны подвижности.
Повышать планку требований по мере обучения клиента новым стереотипам движения.
Усложнять программу, добавляя нагрузку различными способами, улучшая функциональность и создавая так называемую зону буферных возможностей.
Все этапы составляют единый процесс работы Прикладной Функциональной Науки: «Принципы – Стратегии – Техники». Это логически обоснованный алгоритм, следующий из понимания анатомии, физиологии и биомеханики человека, которые едины для реабилитационной работы, прогресса в тренировочном процессе, предотвращения травм.
Такая логика помогает специалисту принимать решения, какие упражнения и в какой последовательности следует выполнять конкретному индивиду для достижения наилучшего результата в каждый момент времени. Любые движения могут быть модифицированы для соответствия индивидуальным особенностям человека: его силовым качествам, гибкости, силе, координации и выносливости.
Перевод статьи доктора Дэвида Тиберио
Выполнила Любовь Жуковская, FAFS, выпускница Gray Institute USA
The squat is a staple exercise in almost every resistance-training program. Today athletes of all ages and skill levels use the barbell squat to gain strength and power. However, a good amount of controversy still exists on its safety. There are many opinions when it comes to optimal squat depth. Some experts claim squatting as deep as possible (ass-to-grass) is the only way to perform the lift. Others believe deep squats are harmful to the knees and should never be performed. So who should we believe?
History 101
To start, we need to discuss where the fear of deep squatting originated. Let’s take a trip back to the 1950’s. We can trace the safety concerns with the deep squat back to a man by the name of Dr. Karl Klein. The goal at the time was to understand the reason behind the rise in number of college football players sustaining serious knee injuries. He suspected these injuries were in part due to the use of full range of motion deep squats during team weight training. Klein used a crude self-made instrument to analyze the knees of several weightlifters who frequently performed deep squats.
In 1961 he release his findings, stating that deep squatting stretched out the ligaments of the knee (1). He claimed this was evidence that athletes who performed the deep squat were potentially compromising the stability of their knees and setting themselves up for injury. He went on to recommend that all squats be performed only to parallel depth.
Klein’s theory was eventually picked up in a 1962 issue of Sports Illustrated. This was the catalyst he needed to spread the fear of deep squatting and save the knees of athletes everywhere. The American Medical Association (AMA) soon after came out with a position statement cautioning against the use of deep squats (2). The Marine Crops eliminated the “squat jumper” exercise from their physical conditioning programs (2). Even the superintendant for New York schools issued a statement banning gym teachers from using the full depth squat in physical education classes (2).
There were some individuals who disagreed with Dr. Klein. In May of 1964 Dr. John Pulskamp (a regular column in the notorious Strength and Health) wrote, “full squats are not bad for the knees and they should certainly not be omitted out of fear of knee injury” (5). Despite Dr. Pulskamp’s best efforts, the damage that Klein inflicted had been done. By the end of the decade strength coaches across the country stopped teaching the full depth squat. In some cases, the squat was dropped from training programs all together (1).
Thanks to the advancement in exercise science and biomechanics research, we have learned so much more about forces sustained during squats. Lets now go over what we have learned in the past few decades in order to better understand what exactly happens at the knee joint during the deep squat.
Squatology 101
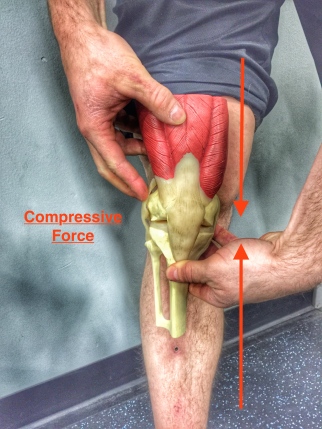
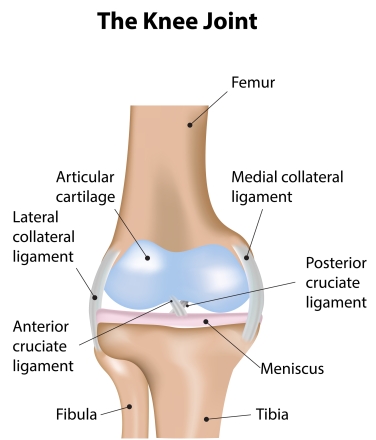
When we squat our knee sustains two types of forces: shear and compressive. Shear forces are measured by how much the bones in our knee (femur and tibia) want to slide over each other in the opposite directions. These forces in high levels can be harmful to the ligaments inside the knee (ACL and PCL). These small ligaments are some of the primary structures that hold our knee together and limit excessive forward & backward movement.
Compressive force is the amount of pressure from two parts of the body pushing on each other. There are two different areas that sustain this type of force in the knee. The meniscus absorbs the opposing stress between the tibia and the femur. The second type of compressive force is found between the backside of the patella (knee cap) and the femur. As the knee bends during the squat, the patella comes in contact with the femur. The deeper the squat, the more connection between the patella and the femur.
When we look at these forces (shear and compression) we see that they are typically inversely related. This means when the knee flexes during the squat, compressive forces increase while shear forces decrease (6).
Ligament Safety
Some medical authorities have cautioned against the use of deep squats due to excessive strain placed on the ligaments. However, it appears these concerns are not based in science at all.
Science now tells us that the ligaments inside our knee are actually placed under very little stress in the bottom of a deep squat. The ACL (anterior cruciate ligament) is the most well known ligament of the knee. ACL injuries are common in popular American sports such as football, basketball, soccer, lacrosse, etc. The stress to the ACL during a squat is actually highest during the first 4 inches of the squat descent (when the knee is bent around 15-30°) (7). As depth increases the forces placed on the ACL significantly decrease. In fact, the highest forces ever measured on the ACL during a squat has only been found to be around 25% of its ultimate strength (the force needed to tear the ligament) (8).
The PCL (posterior cruciate ligament) is the second ligament that is found inside the knee. During the squat it sustains max forces just above a parallel squat position (around 90° of knee flexion) (10). Just like the ACL, this ligament is never placed under excessive stress during the squat. The highest recorded forces on this ligament have been only 50% of the estimated strength in a young athlete’s PCL (10).
In fact, science has shown that the deeper you squat the safer it is on the ligaments of your knee. Harmful shear forces are dramatically decreased due to an increase in compression. Also, the muscles in our legs work together to stabilize the knee. As we squat the hamstrings work with the quadriceps to counteract and limit excessive movement deep inside the knee (6).
Thus, the ACL and PCL stay unharmed no matter how deep the squat!
Knee Stability
The original studies by Dr. Klein claimed squatting deep stretched out the ligaments that hold the knee together and ultimately leaving it unstable. However, these claims have never been replicated. Researchers have even used a copy of Klein’s testing instrument in their own studies. Their findings disapproved Klein’s research. They found that athletes who used the deep squat had no difference in the laxity of their knee ligaments than those who only squatted to parallel (3).
Science has actually shown that squatting deep may have a protective effect on our knees by increasing its stability! In 1986 researchers compared knee stability among powerlifters, basketball players, and runners. After a heavy squat workout the powerlifters actually had more stable knees than the basketball players (who just practiced for over an hour) and runners (who just ran 10km) (9). In 1989 another group of researchers were able to show that competitive weightlifters and powerlifters had knee ligaments that were less lax than those who never squatted (4). Again and again, research has shown that the deep squat is a safe exercise to include in a healthy athlete’s training program.
When can deep squatting be harmful?
Theoretically, most of the damage that the knees would sustain from deep squats would be due to excessive compression forces. Some authorities claim that because deep squats raise compression forces at the knee they cause the meniscus and the cartilage on the backside of the patella to wear away. While an increase in compression would lead to a greater susceptibility for injury, there has been no such cause-and-effect relationship established by science!
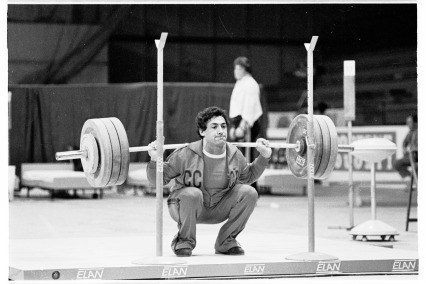
If this were true, we would expect to see extreme amounts of arthritis in the knees of weightlifters and powerlifters. Fortunately, this is not the case. There is little evidence of cartilage wear in the knees as a result of long-term weight training. In fact, elite weightlifters and powerlifters (who sustain loads up to 6x bodyweight to the knee in the bottom of a deep squat) have relatively healthy knees compared to you and me! (11)
Considerations for Squatting Deep
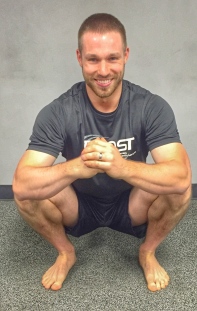
Every coach must consider a few things when determining optimal squat depth for an athlete. Everyone should have the capability to perform a bodyweight squat to full depth, period. That being said, the depth of the barbell squat should be based on the requirements of an athlete’s sport. A weightlifter for example needs to establish strength in the full depth squat in order to lift the most amount of weight on the competition platform. On the other hand, a barbell ass-to-grass squat is not necessary for a soccer player. He or she can still gain efficient strength and power from a parallel depth squat.
An athlete’s injury history also needs to be taken into account when determining optimal squat depth. Often athletes will ignore pain in their pursuit of performance gains. The phrases “no pain, no gain” and “know the difference between hurt and injured” cannot apply to the weight room. Pain is like the warning light in our car. The light is indicating something is wrong. Just as ignoring your car’s warning light on will lead to engine problems, pushing through pain in the weight room will lead to injury of our physical body. For this reason, if an athlete is injured and has knee pain, deep squats may not be the best choice. The depth of the squat must be limited to a pain free range if we want to stay healthy and continue to compete injury free.
Squat depth should also be limited if it cannot be performed with good technique. Poor movement only increases our risk for injury. An athlete’s body is like a finely tuned sports car. Constantly driving pedal to the metal and taking aggressive turns will lead the car to break down faster. The same goes for squatting. You can only lift so much weight poorly for so long before your body sustains an injury. Squatting to full depth poorly is a great way to invite injury.
Take Away
So what have we found out since 1964? Contrary to mainstream belief, we now know that squatting deep or “ass to grass” is actually not as dangerous as Dr. Klein made it out to be. Research again and again has failed to support the theory that deep squats are bad for the knees in healthy athletes.
For athletes with healthy knees, performing the squat to full depth should not cause injury as long as heavy loads are not used excessively. Proper training programs should employ light, medium and heavy intensity cycles throughout the year in order to lessen any harmful effects of constant heavy loading. Now that you have a deeper understanding of full depth squats, feel free to get that ass to the grass!
"Rigid body" analysis - where the shape and dimensions of a body are considered to be constant and undeformable regardless of the forces applied to it - is useful in the analysis of complex human movement, like the deadlift.
The Standard Pulling Position is where the bar travels up the legs in a vertical line over the middle of the foot. The shoulders stay just forward of the bar until the top of the pull.
The most efficient way to pull a barbell is straight up. Always.
A correct deadlift will start with the bar about one inch from the shin, placed with the shin in a perfectly vertical position.
The heavier the weight the more efficient the pull must be. Warm-ups can be done "wrong," as can rows, cleans, snatches, and anything else with a light weight.
Looking up when deadlifting is a common mistake.
The alternating grip allows you to pull more, but it can cause injuries.
Warning: Dry technical article. Very little cursing, no bashing, no actual controversy. Just logic and analysis. Caffeine will be helpful.
"Rigid Body" Analysis
The human skeleton is the system of levers that we use to interact with our physical environment.
It's operated by a system of "motors" - little tension engines called "muscles" that operate the levers of the skeleton by generating a contractile force.
The details of the operation of this physical system can therefore be understood through analysis, and these details can be as complex or as general as the level of the analysis.
With more than 600 muscles and 200 bones, things can get very weird. Or they can be rendered understandable by pulling back a little and viewing the system as a chain of segments that transmit the force generated by the groups of muscles that operate them.
Running, jumping, throwing, swimming, and hitting a ball are fantastically complex activities if all of the constituent muscles and bones must be enumerated, each of their contributions to the functioning kinetic chain considered, and their individual force-production/transmission roles calculated.
It's not only impossible with our current instrumentation, it's rather pointless, because enumerating the individual contributions of the forearm muscles and bones of the wrist to a racquetball serve don't help us serve the ball, or learn how to do it better.
Movements become analyzable if you consider them at the macro level - the functional segments of the body operating against the resistance of the implement or the ground, and the primary muscles responsible for their operation.
The concept of "rigid body" analysis - where the shape and dimensions of a body are considered to be constant and undeformable regardless of the forces applied to it - is useful in the analysis of complex human movement.
A stride in a sprint is a hip/knee extension with a contralateral hip/knee flexion. The kinetic relationships of the feet, shank, thigh, trunk, and arms are complex enough without having to enumerate the roles of their constituent components.
In coaching the sprint we're primarily concerned with the force production and transmission relationships of the segments themselves, and we're less concerned with their internal components.
It's important to understand what the calf muscles, quads, hamstrings, glutes and adductors, spinal erectors, and shoulder girdle muscles are doing, because this understanding informs us about force production within the functional segments.
It isn't as important to detail the mechanical function of the obturator, the peroneus longus, or the long head of the triceps brachii in the sprinting motion, or their respective percentages of force contribution at any given point of their participation in the movement.
Their functions become important to consider in the event of an injury, and an informed coach knows enough anatomy to understand these functions, but we don't single them out for training because they're worked along with the primary muscles as they fulfill their anatomically-determined role in the correctly-performed gross motor pattern.
More important are the feet, shank, thigh, trunk and arms during the development of the acceleration as revealed by the analysis of their relative angles and their relationships to the ground.
The individual muscles that make this happen are not of concern during the execution of a record performance, unless one of them fails due to injury.
Strength training has long been the victim of a lack of focus on the movement patterns of the segments of body itself, in lieu of the great deal of attention being paid to the constituent components - the "muscle groups" of bodybuilding-think.
Let's examine your favorite and mine, the deadlift, from the perspective of rigid-body analysis, and see if we can't come to a better understanding of what actually happens when a bar is pulled from the floor.
The Mechanics of the Deadlift
An examination of men's division deadlift records on video will show you what you need to know about the relationship between the loaded barbell and the lifter: the barbell travels up the legs in an approximately vertical line over the middle of the foot, while the shoulders stay in a position just forward of the bar until the top of the pull.
And this is true no matter what the lifter attempts to with the bar; you may start somewhere else, but you're going to end up doing the pull this way.
We call this position The Standard Pulling Position, because, as we'll see, it results in the most efficient pull for deadlifts, cleans, and even snatches.
(The reason why women's deadlifts don't always obey this rule has to do with the same reason women can perform a much higher percentage of their 1RM for reps, but that's a subject for another article.)
It's important to know why this amazing lack of variation exists in pulling a heavy barbell from the floor, because if we know what's going to happen when we pull a heavy deadlift, we can make better plans for making it happen with the greatest level of reproducible efficiency.
If you know that the barbell is coming up in a straight line over the mid-foot, you can practice placing it in that position and keeping it there.
And if you know that the shoulders are going to be a little forward of the barbell when it leaves the floor, you can make plans to have them in this position when the pull starts.
Knowing why is good, because it convinces you that correct technique is important.
It's not nearly as important to know what role the individual forearm muscles play in the effort, or the obturator, the peroneus longus, or the long head of the triceps. They're working, and good deadlift technique is designed to make them contribute to the pull.
But more important is the overall relationships of the major segments of the kinetic chain to the load on the bar.
Why Vertical?
Gravity is the force that makes mass "weigh" what it does. It's the attraction between two masses.
In the case of the earth, it's really really big relative to the barbell, so the attraction between the two masses is heavily skewed.
Since the attraction is between the two Centers of Mass, the center of the barbell and the center of the earth have a very predictable relationship: gravity operates on the bar, and it does so as a downward pull, in the precise direction of the center of the earth's mass. Always.
We call this direction "vertical."
As a result, work done against gravity is always performed vertically, upward. Always. All work done against the gravity vector will be done parallel to that vector in the opposite direction. Therefore, the most efficient way to pull a barbell is straight up. Always.
This will be the shortest explanation in this article. Sorry.
Why the Mid-foot?
A correct deadlift will start with the bar about one inch (2.5cm) from your shin, placed with the shin in a perfectly vertical position. This will place the bar directly over the mid-foot, for everybody.
Human feet are quite thoroughly proportional, front to back, and we've seen people with size 3 to size 17 shoes position the bar over the mid-foot with it placed an inch forward of the shins.
Once the bar is over the mid-foot, turn your toes out a little, maybe 15 degrees.
When this position is taken and the knees are dropped forward and out a little, so that the shins touch the bar without moving it and the knees stay parallel to the toes, the shin angle will be perhaps 7 or 8 degrees forward of vertical.
The knees-out position allows you to use the hip external rotators more effectively when you pull, and it also makes more room between your thighs so you can set your lumbar extension more effectively.
Knees out also involves the adductors in the pull as well, by stretching them into a position where they can more effectively participate as hip extensors.
And the slight shin angle allows the quads to perform enough knee extension to help with the start of the pull. Knees any more forward than this will cause the shins to push the bar too far forward to pull a deadlift. Here's why.
The foot is your point of contact with the ground. If the bottom of your foot was an arc, as though you were standing on a 12-inch piece of pipe that was split down the middle into halves, the mass of the system would be in balance directly over the center of the arc - your mid-foot.
If you were in good balance, you could squat down and stand back up by keeping your center of mass directly over the middle of the arc. Even though your feet are essentially flat against the ground, the balance relationship is clearly the same.
The surface area of the feet is the area across which the load of the combined mass of the barbell and your body is distributed against the floor.
A man with a size 11 weightlifting shoe will have a surface area of about 90 square inches (580 cm²), or an average of about 5.5 pounds per square inch with a 500-pound deadlift (3.84N/cm²).
At 800 pounds, the load is closer to 8.9 PSI. If the barbell is placed in a position halfway between the toe and the heel, the average load across the contact surface will be fairly evenly distributed - "balanced" - between forward and aft sections of the foot.
If the most even pressure distribution occurs with the load at mid-foot, positions either forward or behind this point will display an unevenly loaded surface area.
Forward of the mid-foot, the load distribution will skew forward, reducing the surface area of force distribution - likewise if the bar is behind the balance position.
Physics Class
The most important effect of this uneven loading is that it sets up uneven moment forces between the balance point and the lifter/barbell Center of Mass measured vertically from the floor.
Moment force, or leverage, is the turning force your hand transmits to a bolt through a wrench. If we measured the force of the spin along the shaft of the bolt, that quantity would be torque, but we aren't concerned with torque since nothing in a human joint spins under normal circumstances.
We're merely concerned with the force transmitted along the shank, thigh, and trunk segments between the barbell and the floor - the force that moves the load.
A wrench multiplies the force you can generate with your hand by trading a longer arc of motion at a higher velocity for a much shorter arc and a higher amount of force. A crowbar works the same way, distance and velocity exchanged for force - mechanical advantage.
The moment arm is the distance between the point of force application (your hand on the crowbar) and the point of rotation (the bend in the short end of the crowbar), measured at 90 degrees to the force application, and it's the way the multiplication of force is calculated.
The longer the moment arm, the greater the leverage at the point of rotation.
A crowbar has a long segment, a bend, and a short segment, and is meant to be used to generate high force when prying a nail out of a board. Here's an example of the same long/short segment configuration used the opposite way:
The trebuchet is a siege engine that uses a very high amount of force on the short segment to increase the velocity of the light load on the end of the long segment.
In this system, the multiplication takes place in the opposite way: like stepping on a rake, high force operating the short segment rotating around a fulcrum produces a high velocity at the end of the long segment, if the force is high enough on the short end.
The angular velocity on both sides of the fulcrum is the same, and the long moment arm multiplies the velocity along the arc at the end of the long segment.
Now, think of the horizontal distance between the mid-foot and the 600-pound bar as a lever against your feet, with the vertical distance up the legs as the segment. If the bar is above the knees and you shift forward 2 inches, the distribution of the weight against the floor shifts forward.
Along the vertical distance between the floor and the barbell, leverage is being applied to the system that wouldn't be there if the bar was directly vertical to the mid-foot.
The horizontal distance between your hips and the bar constitute a moment arm, one that you use to generate enough force to pull the bar up. The additional 2 inches of moment arm your technical mistake has created gives the load on the bar some additional leverage against you.
The total amount of moment force that must be generated is optimal when the bar is over mid-foot, but now the force of the additional 2 inches must be added to the amount of force you have to produce to keep the 600 pounds moving up.
Moving the bar back behind the mid-foot to shorten this moment arm doesn't work, because you're off-balance backwards against the floor, and because moving the hips back lowers them in relation to the knees.
Since the bar moved forward, the countering force that must be added to the pull comes from behind.
At the bottom of the pull, the posterior tug comes from your calf muscles - the gastrocs and soleus. You can feel this effect for yourself if you stand up straight and let your bodyweight drift onto your toes.
It's easy enough to counter this off-balance shift without a 600-pound bar to deal with, but adding enough backward pull from a bar position above the knee can't really be done, since calves aren't designed or positioned to generate force against a barbell above the knee.
Those of us who have ruptured an Achilles tendon know how this works with a load on our backs or on the floor in front of us - the effect is subtle, until you can't produce it effectively, and then you miss a rep or fall forward.
If you start with the bar forward of the balance point, it will roll back to the mid-foot before it leaves the ground, thus correcting the problem while the vertical distance between the bar and the foot is manageably short.
If the weight is light enough, as with a clean, the bar can be pulled off the ground in this forward position, but it will be pulled back toward the balance point as it rises, thus creating a curve in the bar path off the floor.
If it's light enough to pull very inefficiently, as with a snatch, a strong lifter can throw it all over the room and still catch it overhead - not efficient, but quite commonly performed.
If you get forward higher in the pull, the way you might try to save the lift is by making your back angle more vertical earlier in the pull than you would if the bar was in balance - you look up, and you lean back, or at least try to lean back.
This doesn't work very well, as some of the recreational federations have admitted by placing a spotter behind their less-than-technically-competent deadlifters at their meets.
Why the Shoulders Forward of the Bar?
This is a very interesting phenomenon, because it doesn't seem logical that the arms would not just hang straight down when loaded, like a plumb line mirroring the gravity vector.
The point of rotation is the shoulder, the barbell is in the hand, the arm connects the two points, and the damn thing ought to behave properly.
But it doesn't.
Every heavy deadlift hangs from the shoulders with the arms at a slight angle, perhaps 7 to maybe 11 degrees, with the shoulders just forward of the bar, and with the bar over the middle of the foot.
The back angle adjusts to place the shoulders in this position; if the hips are too low, with the shoulders back behind the bar, the back angle will adjust horizontally to place the shoulders in the Standard Pulling Position.
Furthermore, the following generalization is born out by repeated observation: the heavier the pull, the more likely it is to conform to this alignment, and the lighter it is the greater the amount of deviation it's likely to display.
Watch Brad Gillingham's 881/400kg deadlift. Brad comes to the bar and carefully places his mid-foot directly under the bar - shins about an inch from the bar - takes his grip without moving the bar, drops his knees forward until shins touch the bar, squeezes his chest up, and pulls the bar in a vertical line to lockout.
His back angle at the very start of the pull doesn't change to more horizontal, and in fact immediately becomes more vertical as the bar is pulled up.
Notice the shoulders just forward of the bar (ignore the black shirt, look at his shoulders and hands), and notice that the arms don't become vertical until just before lockout.
Perfect pulling efficiency is displayed with the bar over the mid-foot and the shoulders just in front of the bar, the heavier the weight the more efficient the pull must be. You can watch videos for hours on end that show this pattern.
Warm-ups can be done "wrong," as can rows, cleans, snatches, and anything else with a light weight. But when the last bits of your limit capacity are approached, this alignment must be displayed or you miss the pull.
Look at this heavy set of 745x4 by Mike Tuchscherer:
When the bar is forward of the mid-foot during the reps of this set, it drifts back during the pull, but notice the position of the shoulders over the bar, evidenced by the arm angle.
Mike is strong enough to pull this weight with a little horizontal slop in the floor pull, and he does this with heavy attempts as well. But the bar always drifts back to the mid-foot.
More importantly, why are his shoulders in this persistent forward position? This is best explained with an illustration.
Moment force - leverage, like your hand generates when it pulls on a wrench - is most efficiently applied at 90 degrees to the tool being pulled on, be it a wrench, a crowbar, or a hammer.
The latissimus dorsi muscles attach the lower back to the upper arm; specifically, the lats originate on the back from T8 all the way down to the sacrum and across the top of the pelvis, and have an insertion point on the medial anterior proximal humerus, essentially in your armpit.
The shoulders just in front of the barbell place the lats in the best position to apply moment force to the humerus - to best pull the bar back to keep it over the mid-foot balance point.
The lats at 90 degrees is the alignment generated by the shoulders-in-front-of-the-bar position with the arms hanging at an angle, as the figure shows.
You can see the effect of this position quite clearly: control of the tendency of the bar to drift forward is best accomplished with the backward tug provided by the lats.
And the back angle - the angle between the plane of the trunk and the horizontal floor - is what controls the position of the shoulders relative to the bar, and thus the angle of attack between the lats and the humerus.
The actual back angle that occurs in a properly positioned pull is dependent on anthropometry.
A short back and long legs will obviously generate a more horizontal back angle in the proper position than a long back and short legs. In either case, the proper position for the lats against the humerus will result from a shoulder position just in front of the bar that hangs the arms at 7-11 degrees, any variation being due to anthropometry.
But the lats generate tension between both origin and insertion, so they're pulling on the lower back as well.
Part of the back angle settling into position with shoulders forward of the bar is probably a function of the hips being pulled up into that position by the lat's anterior tension on the low back, as the muscle belly settles into its optimum force production length in isometric contraction.
This effect also rotates the mass of your body up into a position more above the bar. As your own mass moves into a position so that more of it is forward of the bar, the center of mass of your body lines up better with the center of mass of the barbell.
Pulling it upward is then easier, since you obviously can't pull upward on something in front of you. A deadlift will always be in front of your legs, and that's why you lock it out with a slight backward lean - to balance your mass back against the bar in front.
But during the pull, some of your mass - including your head, if your neck is positioned correctly - remains forward of the bar, and the arms don't become completely vertical until you finish the pull.
As for the minutia of the system, the teres major and the long head of the triceps also cross the shoulder joint between the scapula and the humerus, and therefore they're also involved in this moment force relationship.
But the triceps long head is at a very poor angle for generating moment force across this gap, and the teres is a short small muscle; neither are terribly important to the consideration of the larger mechanism at work.
The lats hold the bar back over the mid-foot, and they hold the back angle in a position to keep your mass more over the bar.
Two other back angle configurations are possible.
This is the most common start position in competitive powerlifting, and it's inefficient for reasons that are obvious in light of this analysis.
The most compelling argument against it is the fact that everyone who starts a heavy deadlift here exhibits a shift in back angle towards the Standard Pulling Position.
You can try to pull the bar with vertical arms and hips down too low - "squat with the bar in your hands" - but it just doesn't work that way.
The fact that the extraneous movement occurs before the bar leaves the floor, and that it can be pulled without this extraneous movement demonstrates that a higher-hips position is a more efficient place to start a deadlift.
Watch Ed Coan:
Note that the greatest lifter in the history of the sport of powerlifting demonstrates this shift in back angle.
The pull starts when the bar actually leaves the floor, and during the time between when his upward motion started and the bar leaving the floor his back angle changed.
In fact, there's a slight pause in the motion as the system comes into stability, just before the bar leaves the floor, as the lats "grab" the bar. This is a very common start technique, and there are countless examples of it, to the extent that it's considered by some to be the best way to pull.
If the hips are low, the lats are not optimally engaged with the arms, and the lower back isn't optimally anchored to the bar - the lat generates tension against both the origin and the insertion.
As the lat becomes optimally aligned to hold the bar back over the mid-foot, it also pulls the hips up into their characteristic position, and the resulting back angle is stable just as the bar leaves the floor.
Again, the actual angle depends on anthropometry, but the alignment itself produces the back angle.
This is the other back angle with which the bar can be pulled:
In this position, the lat's angle of attack has opened beyond 90 degrees. This is recognizable as the classic stiff-legged deadlift position, with knees extended and back angle more horizontal.
Those of us (who even lift) know that you can't pull as much in this position as you can with an optimal back angle, and that if you start here you'll almost certainly miss the attempt unless you can lower the hips and pull the bar back in.
The ability to stabilize the bar over the balance point is critical to the ability to apply enough force to pull the deadlift. But there is another reason...
What About The Hamstrings?
Look at the three positions in Figures 9, 10, and 12, and notice the hamstrings.
The hamstrings are really a poorly understood component of the squat and the deadlift, the subject of much unnecessary stretching and "mobility wodding."
Remember the basic rule of hamstring kinematics in the pull and the squat, (and most everything else too): As the hips flex, the knees flex.
If the angle of hip flexion remains roughly equal to the angle of knee flexion, the hamstrings haven't changed muscle belly length very much. Thus, hamstring flexibility isn't the determining factor in squat depth.
If the hamstrings don't change length - this is very hard to measure, and is why it hasn't been done quantitatively - hamstrings function primarily as isometric stabilizers of the back angle in both the squat and the pull.
In both movements, their primary contribution to the kinetic chain is support of the back angle. They anchor the ischial tuberosity to the medial and lateral attachments on the tibia, at the knee.
This pelvis-to-knee connection functions as a bridge between the extending knees and the extending hips, enabling the force generated by the quads, glutes, and adductors to move the load without the back angle collapsing horizontal.
Along with the spinal erectors and the lats, the hamstrings are the "isometric glue" that holds the pull together.
This, coupled with the fact that a muscle generates its greatest contractile force isometrically, at its resting length, means that whatever position generates the best semblance of resting muscle belly length will be the strongest position to use the hamstrings isometrically.
Our analysis shows that in a squat, the low-bar position holds the hamstrings at resting length (or possibly slightly stretched, depending on the lifter's anthropometry) throughout the movement.
In a high-bar squat or front squat, the knee angle is more closed and the hip angle is more open, shortening the hamstrings from their resting length and therefore diminishing their isometric capacity to anchor the back angle.
In a deadlift, the correct start position finds the hip angle more closed and the knee angle more open than in the low-bar squat bottom position, with the hamstrings stretched slightly beyond their resting length, allowing them to contribute primarily isometrically as they hold the back angle in place, as well as contributing to hip extension at the top of the pull as they return to their resting length.
The position which generates the most mechanically-efficient angle of attack on the tibia and the pelvis will be the position that can generate the greatest back angle stability during the first part of the pull.
Look at these three positions and decide for yourself which works best for hamstring function.
What About The Back Angle?
As the bar travels up the shins in a deadlift, the back angle becomes more vertical. This begins immediately after the bar leaves the floor.
In a clean or a snatch - sub-maximal accelerated pulls by definition - the back angle should (and usually does) stay more constant and more horizontal until the bar gets much higher. "Staying out over the bar" is a familiar concept to some Olympic lifters, their having heard the cue many times.
What does it mean, and why?
The concept of the moment arm is quite important throughout barbell training, and nowhere more important than when considering the role of the back in the clean and snatch versus the deadlift.
The primary difference between the Olympic lifts and the deadlift is acceleration - the first derivative of velocity, the rate at which velocity increases.
A clean is a pull that's accelerated enough to catch on the shoulders.
In order to impart sufficient momentum to the loaded barbell that it continues on upward between the end of the pull and the catch on the shoulders - that portion of the bar path during which no force is transmitted to the bar by reacting against the ground - it must be sufficiently accelerated so that it "floats" long enough to shift the feet and the arms into the catch position from the pulling position.
The snatch is caught overhead, and is thus a longer pull with an obviously lighter weight.
As such, there are no slow cleans or snatches. They must be accelerated or they don't rack, and this is why they're better measures of power than "dynamic effort" deadlifts. How precisely do you "miss" a dynamic-effort deadlift?
In stark contrast to a clean, a deadlift can be slow. Some world records have taken 8 seconds to pull, as opposed to less than a second for a clean or snatch.
This critical distinction is the reason for the difference in the behavior of the back angle between the fast and slow pulls: a deadlift shows a back angle that becomes more vertical as it leaves the floor, while a clean and especially a snatch preserve the horizontality of the back angle as long as possible.
Dimas was the undisputed master of staying out over the bar, preserving his back angle until the bar was above his knees.
NOTE THE DIFFERENCES IN THE SPINAL POSITION OF THESE TWO LIFTERS. THE DIFFERENCE IS ACCELERATION.
This is important because of acceleration, and the way it's produced in a fast pull. A clean is a pull in which the back angle/hip moment arm can be maintained long enough to accelerate the barbell - to increase the linear velocity of the barbell by using the mechanical advantage of the longer moment arm.
The back segment between the hip and the barbell is the "tool" the lifter uses to accelerate the bar. Look at this leverage arrangement:
Like the trebuchet, the clean uses the short moment arm loaded to a high force level and operating over a short arc around the fulcrum to accelerate a much longer moment arm with a lighter load on the end - if you're strong enough.
If the weight is too heavy, this long moment arm can't be maintained; the back angle becomes more vertical immediately because the longer moment arm can't be operated by the posterior chain musculature, the weight therefore can't be accelerated, and it's a deadlift instead of a clean.
And this is why a deadlift can be done with some spinal flexion, and a clean is much more dependent on lumbar and thoracic extension.
Many heavy deadlifts have been pulled with a round upper back, but Olympic lifters who fail to keep their backs tight and flat will have problems reproducing their technique accurately - a rounding back is a power leak, and the deadlift doesn't rely on power and acceleration like the Olympic lifts do.
The Other Details
Sometimes, but not very often, the fine anatomical details of origin/insertion/action of the individual muscles are critical, so forget all that shit I said about this earlier.
Here are a couple of examples where the details about things that can't be analyzed as a rigid-body problem are important.
Eyeballs
Eye gaze direction is critical in all barbell exercises, and is the most commonly misunderstood aspect of squatting and deadlifting.
The chest follows the eyes, and the back angle is the chest. It's very important to understand the role of the trunk segment in the mechanical execution of these two lifts in particular, and how the eye gaze direction can affect the physics of the lifts.
Since this is a deadlift article, we'll stay with pulling. If you look up, the vast majority of you will have overextended your cervical spine - your neck.
This seems probably counterproductive, considering the fact that the spine is best loaded in normal anatomical position, the way it's best configured to transmit force between the vertebral bodies spaced apart with intervertebral discs, who like to be loaded in compression the way they're designed to transmit force.
Your head actually weighs 5-8% of your bodyweight, and keeping your neck in normal extension maintains the position of more of your body's mass in front of the bar. It actually produces a longer back segment, some of which is then positioned forward of the bar.
We've already observed that you can't pick up a heavy object that's too far "in front" of you, and that more of your mass forward of the bar balances the alignment of the bar's center of mass and that of your body.
Keeping your head in line with your back maintains this mass relationship much better than an overextended cervical spine. This effect is obviously more important in a lighter pull, like a clean or a snatch.
Now, observe the anatomy of the traps. Note that it has an origin from the base of the skull all the way down to T12, thus making it the longest muscle origin in the human body.
Note that almost all these fibers insert on the spine of the scapula. The traps therefore support the scapula, which articulates with the arm, which holds the bar. The bar therefore hangs from the traps, which hang from the spine, from the base of your skull down to the last vertebra with a rib attached to it.
And you want to lift a heavy weight with the top one-third of your spine in overextension, with your neck curved like a hook? You should probably rethink this decision.
We've already explored the role of the back angle, so do an experiment. Stand up straight and look at the floor about 15 feet in front of you. Note your posture and the weight distribution on your feet against the floor.
Now, look up at the ceiling, the way your high-school football coach told you. "Look up, son! You gotta look up if you wanna go up! I said look up, boy! Look up through the top of your skull!"
Our experience with this little test indicates that about 80% of you will feel your weight go to your toes. This is because your chest follows your eyes, and your back angle follows your chest, and you lean onto your toes to compensate so you don't fall backwards.
If this happens at the bottom of the pull (or the squat) when your knees and hips are in flexion, the result will be that the hips move forward a little, since "the back bone's connected to the hip bone."
And since "the hip bone's connected to the knee bone," the knees will move forward a little too. This closes the knee angle and distally slacks the hamstrings, which you're trying to use to support the moment arm on the hips.
If you have trouble in the middle of a pull, check your eye gaze direction and see if you're looking up. If so, try fixing your gaze on a point on the floor that holds your chest in the best position to use your back angle for the pull.
Grip
You've probably been taught to use an alternate grip when you deadlift. This position places one hand supine and the other hand prone on the bar, and is a very secure grip for a heavy single.
It also places one shoulder in internal rotation and the other in external rotation. Most competitors use an alternate grip in a meet. But not all of them - look closer at Gillingham's 881 above.
And not every pull is a limit deadlift. There are consequences to the use of asymmetric shoulder loading in a pull, and some attention should be paid to this when you decide which grip to use.
Focus now, just one more time: Remember that the lat attaches in the armpit, to the proximal medial anterior humerus, in front and on the inside of the bone.
When you assume a supine grip and externally rotate the humerus, you're altering the tension on the lat by increasing its length relative to a prone grip in internal rotation. You're also creating a wonderful opportunity to add bicep tension - and therefore elbow asymmetry - since the bicep is the primary elbow supinator.
This asymmetric lat tension could have significant consequences in the start position of the pull, because of the resulting asymmetric tension on both the origin and insertion - the low back and the upper arm. Many people rotate away from the supine side during a deadlift.
How many low back tweaks have resulted from an alternate grip? I don't know, more that 8 or 10, but it's something to think about when you decide between an alternate grip and a hook grip.
In Short...
Just improve your deadlifts, and think a little more clearly when you come to the bar.
Note: Illustrations are the copyright of the The Aasgaard Company.


 Для этого необходимо: